Building Inbound Links

Inbound links is one important factor to improve pagerank and quickly indexed by search engines, this one step from SEO.

"In basic link terminology, a backlink is any link received by a web node (web page, directory, website, or top level domain) from another web node . Backlinks are also known as incoming links, inbound links, inlinks, and links inside.(source wikipedia)"


Example image inbound links from other web/blog for the good backling:


Backlinks are incoming links to websites or web pages. Inbound links is important initially (before the advent of search engines) as the primary means of navigating the web; today's significance lies in search engine optimization (SEO). The number of backlinks is one indication of the popularity or importance of that website or page (though other measures, such as PageRank, are also considered important). Outside of SEO, the backlinks of a webpage may attract personal, cultural or semantic importance: they show that attention to these pages.

Lots of ways to create an inbound link that leads to our weblog for example just with the old technique, looking for good quality backlinks, exchange mutual links and banners, commenting on blogs dofollow or also with other techniques that are commonly done by many bloggers seo lovers, if I except looking for inbound links techniques I mentioned above I also tried to find backlinks from web directories, is sizable enough to lift Pagerank our blog.


Example image in our web/blog :


From the above analogy, we can conclude that Inbound links are links that lead to our blog either on the main page (index homepage) as well as on post pages (inner page) which comes from the web / sites / blogs of others or the web / site / blog our own. The link can also be derived from the homepage or can be from the posting of a web page / site / blog specific.

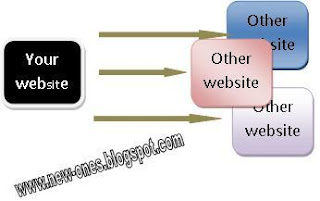
While Outbound Link has the opposite sense, ie a link that we navigate to a web / site / blog either on a particular index or home page on its inner pages.


in addition to build inbound links from outside our website, we also have to build inbound links, or linking any web page / blog. eg index page links to page 2, second page index and page link to view the first three and so on.
Example Outbound Links :
outbound_links


* Note the use of her Anchor Text (text that is used to paste a link in our posts).
  • Try using a keyword anchor text (keyword) that is different.
  • Avoid the use of anchor text by using the same text with the blog URL address. For example, the URL address of this blog is http://new-ones.blogspot.com. If we want to make a link to that URL, try to not use the URL address as an anchor text.
  •  Try using a keyword anchor text that matches the theme of our blog, or our posting categories.
  • Try not to put the anchor text on only one piece of writing, but we can put it in the first paragraph, the center paragraph, and also the final paragraph.
  • We can create links that lead to our own blog or even on another post in one blog that we consider to have a good backlink.
  • Try to create outbound links on each page of posts.
There are many techniques for building inbound links, this is one example of inbound links are most popular.

1- Article Marketing (Syndication) Service:
2- Directory Placement Service:
3- Blog Comments:
4- Social Media Marketing:
5- Video Search Marketing:
6- Press Release Marketing Service:
7- Forums Signature:
8- RSS Submission:
9- Custom Link Building:
Posted on 04.47 / 0 comments / Read More

Steps SEO

SEO (search engine optimize) is a technique used to ensure your site or blog to stay in the top of search engines, but some say that SEO is a mystery that no one can solve explicitly about SEO.

But the SEO (search engine optimize) is very influential for a website or blog, one of the use of SEO is to place the right keywords on your website / blog, it will help any indexed website / blog on search engines.
Lots of SEO steps that should and should at try and really we must pay attention to the continuity of our website / blog to be in the top 10 search engines. For example, proper usage of the right keywords, is very important to target the right so you can reach the right audience, also provide content, videos, and pictures with the right keywords.Used Meta Tags can you read at last post here.

SEO tips from various sources is as follows:

1. Specify the title, which according to the contents of the website / blog, make sure that every page can be indexed by search engines, because search engines sometimes do not want to enter our website into their database right cause url that is not static, use static URLs. Make sure all of its pages to the search engines crawl. Recommended web contains one object do not various.

2. Unique content, unique content is one of SEO that can be quickly indexed by search engines, and unique content will be stored in a database search engine.still fresh and unique content has never been in any post by the web.

3. Determining the domain name for the website, is an important matter that can also indexed in search engines, domain names should be in accordance with the title and content of the website, buying domain names in the country we are targeting, for example, we want a lot of web search in country A will buy A domain in these countries.

4. So that all pages can be indexed / crawled by search engines, make sure every page has a navigation link / text links, because the bot will visit each page through a text link.
For example, the first link connected to link the second and third, and so on.
Avoid the use of java script and flash navigation system, because it will be ignored by the spider bot.

5. Implementing Google Sitemaps is also recommended, as this will help search engines to find pages that may have missed during the crawl.

6. Use keywords and a keyword-targeted allocation appropriately. Of the entire HTML markup, tags that are most important to note is the title and headers. It is advisable to have a different title for every page and to adopt proper hierarchy of headers so that search engines know what content
focus pages.Other posted about keywords can you read at last posted here.

7. Inbound links and outbound links, make sure it can be applied both on our website, between inbound links and outbound links should have something in common with the content of our website.
Also make sure that we put a link on our website is still there.
Search engines like Google only consider  link organic, organic link that there is a natural link to the content, such as the google guidelines say like that.

GOOD LUCK ...!!
Posted on 04.44 / 0 comments / Read More

Add Page Rank Our blog/web

after I read several ways to increase traffic / page rank. so many ways we can do to add traffic begin from exchange links with others, sign up our blog/web to some social networks, make some new posts and SEO (search engine Optimize) that can be difficult to do, and yesterday I blogwalking to blog friend at www.bantuanteman.wordpress.com and there was the easiest way to enhance the visitor's way to register our blog / site in Auto surf.
With Exchange Program Join the traffic, essentially as blog walking. but this difference is institutions that deal, with the URL you submit, the website / blog you'll be on show throughout the world. and is legal to do, Web / Blog you will not be baned for committing a fraud.

How do I?

How easy. Simply click on the picture below, then select "register" / live fill the available column. Usually the Site you will be reviewed first, longest 2 days, to see you break the rules Site Auto Surf what not.

Once di approve, you stay "surving ads'", continue and minimize it, while doing the other . , No LIMITATION SURFING , so If you have a 24-hour internet at home, living and turn auto surf continues and minimize.

Every 1 ads that you tough, you get 1 credit, this credit which ever will automatically reduce if there is to see your site. If you have a 100 credit is going to clay 100 visitor your web / blog . Easy right? FREE to join .

The program loads auto surf on the internet, but not all good and proven. The following are excellent programs, and best of all sites, its easy to use and stable.
Posted on 04.42 / 0 comments / Read More

Computer Tips for Computer Security

Almost all people using computers today can change them, browsing the web, check email, and run a word processing program. The problem is that while computers are easy to use, those who have no knowledge about the problem of computer crime has a very difficult time understanding the reasons why it is important to ensure that their computers safe and secure. If you do not want to find yourself you call a computer repair Delaware men to help with virus or security breach, consider doing a few tips and tricks. Computer Tips for Computer Security

1. Update Your Antivirus Software

Antivirus software is great. There are tons of great programs to choose from and they will automatically scan your PC for viruses, malware, and more. The problem is that antivirus programs do not permanently set-and-go solutions. Internet growing rapidly and if you do not update your antivirus software regularly you will be vulnerable to some of the latest viruses and internet crimes out there.

2. Lock Your Computer

Your computer is your personal space. Every person walking into your home or office should not have access to your personal information. Log into the habit of locking your computer every time you walk away, even if you just walk out to the bathroom. computer security breaches can occur in a matter of mere minutes. Enter a password to login again will only take seconds and you will immediately return to work.

3. Avoid Strange Email Link

Be cautious when you receive an email from the company requesting your personal information, even if they look legitimate. Hackers will create an email address that appears similar to that used by the formal organization, but only slightly different. They will send you to web pages that seem to log-in page for the site you're used to. When you enter your information and recognize that you are in the wrong place, you will be given your user name and password. Do not use the link in the email to log-in page if you can avoid doing it.

4. Update Your PC Security

You may receive periodic emails from Microsoft to let you know that the latest security patches have been developed. Do not ignore an email or pop-up messages. They are designed to immediately improve the security breach that the developers identify the platform. Ignore this email and failed to make the update will leave your computer vulnerable as well. Not getting notifications? Go to Windows Update Center and find their own.

5. Select a Strong Password

According to the United States Computer Emergency Readiness Team, the attacker has access to a number of programs that enable them to find out your computer passwords. The more complex your password, the more work will be for them to know, and the more likely they will give up and switch to something easier. Choose a password with numbers, spaces, special characters, and a combination of both upper and lowercase letters.

Use care and caution when using your computer. Every time you enter the Internet you open yourself to potential security breaches. If you are not careful, you will be the next person you call a computer repair technician Delaware to help get things back to normal - even if possible!

Article sourcehttp://EzineArticles.com/?expert=Shelly_Bailey 
Posted on 04.33 / 0 comments / Read More

Download Athentech Perfectly Clear 1.5.7 Photoshop Plugins Terbaru Full Version


Perfectly Clear 1.5.7 merupakan Plug-in Photoshop yang dapat secara otomatis memperbaiki dan menyempurnakan Foto dalam satu kali Klik. Plugin ini memiliki Exposure yang juga digunakan di salah satu Effect pada Topaz Photoshop Plugin, Tapi dengan Plugin Perfectly Clear anda dapat mengatur tingkatan Exposurenya.

Perfectly Clear merupakan Cara termudah dan tercepat untuk memperbaiki Foto-foto dengan kualitas yang bagus dengan hanya satu kali klik

Anda langsung bisa Download Athentech Perfectly Clear 1.5.7 Photoshop Plugins Terbaru Full Version disini

Perfectly Clear promises:
  1. The easiest and fastest way to improve every photo you take – saving you time, and
  2. The highest quality photos you can imagine – what we call superior photos.
  3. Unbeatable value - At only $199 USD. Alternatively you would have to buy at least 5 different plug-ins costing $600 - $750 USD to tackle 8 out of the 11 problems Perfectly Clear handles automatically.
Silahkan Lihat Foto Foto di Galeri situsnya Disini

What's New In Version 1.5.7

1. Presets updated to use less sharpening

The details: Some of you felt that there was too much sharpening being applied to your photo initially, so we've lowered the amount (for example the Default used to apply 90%, now only 50% is applied). You can still apply more sharpening by simply moving the slider bar to the right and creating your own custom preset.

2. Mac only: Fixed bug that was applying the wrong amount of exposure to your final full resolution photo (Plug-in view was correct)

The details: if you turned exposure off in the Plug-in, or adjusted the exposure slider bar to a different amount, or selected a different preset and then re-selected Default, our Plug-in would always apply 100% exposure to the full resolution photo in Photoshop, even if exposure should have been a different value. Now the correct and same amount of exposure will be applied both in Plug-in window and final full resolution photo. Sorry about that!

3. Windows only: You can now run the Perfectly Clear Plug-in via a remote desktop

Note: all of your custom presets will be automatically migrated over when you install the latest version.

Silahkan Lihat Video Cara menggunakannya Di Bawah ini


DiSitusnya Untuk mendapatkan yang Full Version anda harus membayar sebesar $199,Nilai yang Besar. Tapi Di InternetTeknologi.Com anda akan mendapatkan secara Gratis.

Silahkan Download Link Download Athentech Perfectly Clear 1.5.7 Terbaru Full Version : Adobe Photoshop Plugins Di IT Forum,Buka Forum SOFTARE-PC,Buka Thread berjudul Download Athentech Perfectly Clear 1.5.7 Full (Untuk mendownload Di IT Forum anda harus register dulu,Klik Link Aktivasi yang Dikirim ke email,lalu Reply Threadnya)

Extract, Install FIle bernama Setup InternetTeknologi.Com sampai selesai.

Buka Folder Crack sesuai OS anda 32bit atau 63bit
Copy Filenya
Disini saya menggunkan CS5,jadi masuk ke folder Instalasi Plugins CS5

Pastekan Di C:\Program FIles\Adobe\Adobe Photoshop CS5\Plug-ins\Athentech
FINISH

Coba Buka Photoshop anda,Buka sebuah Foto,Klik Filter>>Athentech Imaging>>Perfectly Clear
Silahkan Aturtur tingkat Exposurenya,dan lainnya.
Biasanya setelah Di Exposure dan lainnya,maka warna kulit menjadi sedikit merah.

Untuk menghilangkan merah,tandai Skin Tone,lalu atur tingkat warnanya.
Posted on 21.02 / 1 comments / Read More

Cara Mudah Membuat Artikel Terkait (Related Post)

Membuat artikel terkait? tentu itu adalah hal biasa, tapi bagaimana jika kita memodifikasi artikel terkait tersebut menjadi sesuatu yang unik dan menarik?. Nah Itu baru luar biasa, untuk itu saya akan mengajarkan kepada anda bagaimana caranya memodifikasi artikel terkait anda.

Pada artikel yang lalu - lalu , saya telah menjelaskan bagaimana cara membuat related post/Artikel Terkait dengan rinci dan saya telah berjanji akan mengajarkan cara memodifikasi artikel terkait. Sebelum kita masuk ke tahap ini ada baiknya  kamu membaca terlebih dahulu Cara membuat related post, dan modifikasi ini hanya berlaku pada jenis linkwithin.


Langkah Pertama / First Step

  • Silahkan kunjungi web blogger, dan masuk ke Tata Letak - Edit Html
  • Silahkan download template lengkap.
  • Beri centang di .
Langkah Kedua / Second Step

  • Silahkan Copy code di bawah ini, lalu letakkan di atas kode ]]></b:skin>
#rp{margin:10px 0;padding:0;font-size:12px;list-style:circle}
#rp h2{color:#000;font-size:12px;font-family:Arial, Tahoma, Verdana;font-weight:700;padding:5px}
#rp ul li a{padding:10px;display:block;color:#000;text-decoration:none;border-bottom:1px dotted silver}
#rp li a:hover,#rp li a:active {background:#fff;color:#073763;text-decoration:none;padding:12px}

Keterangan
Pada list-style:circle dapat anda ganti dengan list-style: url(url gambar anda). Usahakan ukuran gambar tidak lebih dari 16x16 px.

Langkah Ketiga / Third Step

  • Cari kode <div class='post-footer-line post-footer-line-3'>
  • Lalu copy code di bawah ini dan paste tepat di bawahnya.
<div id='rp'><h2>Artikel Terkait</h2><ul id='rp'>
<script type='text/javascript'>
 removeRelatedDuplicates();
 printRelatedLabels();</script></ul></div>

Alternatif kedua
  • Jika anda tidak bisa menemukan kode <div class='post-footer-line post-footer-line-3'>, silahkan copy code tersebut tepat di bawah <data:post.body/> jika anda tidak memakai automatic readmore. 
  • Jika anda memakai automatic readmore , maka kode <data:post.body/> akan ada 2. Sebagai contoh :
<b:if cond='data:blog.pageType != &quot;item&quot;'>
<div expr:id='&quot;summary&quot; + data:post.id'><data:post.body/></div>
<script type='text/javascript'>createSummaryAndThumb(&quot;summary<data:post.id/>&quot;);</script>
<span class='rmlink' style='float:right'><a expr:href='data:post.url'>Read More - <data:post.title/></a></span>
</b:if>
<b:if cond='data:blog.pageType == &quot;item&quot;'><data:post.body/>
<div id='rp'><h2>Artikel Terkait</h2><ul id='rp'>
<script type='text/javascript'>
 removeRelatedDuplicates();
 printRelatedLabels();</script></ul></div>
</b:if>

Copy tepat di bawah code <data:post.body/> yang kedua. Bagi anda yang tidak mengerti apa itu automatic readmore silahkan baca di sini.

Keterangan
  • Pada text yang berwarna biru bisa anda ganti dengan yang lain , karena tulisan tersebut merupakan contoh dari text anda.
  • Terkadang kode <div class='post-footer-line post-footer-line-3'> tidak selalu ada di setiap blog, makanya saya berikan 2 opsi. 
Sebenarnya untuk memodifikasi kode - kode sejenis ini anda minimal harus sudah bisa menguasai Html dan Css. Jadi nantinya akan saya ajarkan kode - kode tersebut di Belajar html untuk pemula dan Belajar css keren.
Posted on 20.50 / 1 comments / Read More

Cara Mudah Membuat Read More Di Blogspot

Pernahkah anda melihat blog yang memanjang ke bawah tanpa penggalan readmore?,  biasanya blog - blog tersebut masih baru dan tidak mengerti cara membuat read more di blogspot. Oleh karena itu saya akan membantu anda yang mungkin masih baru di dunia blog. Untuk tahu cara membuat read more, pertama - tama, anda harus mengetahui apa itu script readmore.

Script readmore adalah script yang membantu anda untuk memotong atau memenggal suatu post sehingga artikel anda tidak memanjang ke bawah pada halaman home. Biasanya pemotongan tersebut disertai dengan tulisan baca selanjutnya... atau readmore...  dan terkadang disertai juga suatu gambar.
Terdapat 3 jenis readmore pada blogspot yaitu :

Readmore Jump break
Jump break adalah fasilitas readmore yang langsung diberikan oleh pihak google untuk memotong postingan agar tidak tampil memanjang pada halaman home. Cara membuat read more versi jump break adalah cukup dengan mengklik pada kalimat atau paragraph berapa yang ingin kamu penggal lalu klik insert jump break pada. Lalu klik terbitkan entri.

Readmore Manual
Readmore manual adalah versi lama dari automatic read more yang fungsinya sama dengan jump break, akan tetapi jenis ini sangatlah tidak praktis dan memakan waktu banyak karena kita harus memasukkan kode seperti ini :
(Artikel yang ingin di tampilkan di home)

<blink>...</blink><span class="fullpost">

(sebagian artikel yang tidak ingin di tampilkan )

</span>

Automatic Read More
Automatic Readmore adalah jenis lanjutan dari readmore manual, akan tetapi dalam script ini kita tidak perlu lagi memasukkan kode - kode manual setiap kali membuat post. Semuanya berjalan secara otomatis.

Cara memasang automatic readmore ke dalam blog adalah :

Langkah Pertama
Silahkan masuk ke dalam edit html yang terletak di dalam tata letak.

Langkah Kedua
  • Beri tanda centang pada expand widget template
  • Lalu klik download template lengkap. Download template lengkap berguna untuk menyimpan template anda. Jika ingin membuka file tersebut silahkan klik kanan pada file download lalu pilih open with - notepad.
Langkah Ketiga
Cari kode </head> dengan menggunakan Ctrl+F. Ketikkan Kode tersebut dalam kotak find.

Langkah Keempat
Copy semua code di bawah ini , lalu paste tepat di atas kode </head>. Jika error coba copy code tepat di bawah ]]></b:skin>.


<script type='text/javascript'>
var thumbnail_mode = "float" ;
summary_noimg = 250;
summary_img = 250;
img_thumb_height = 120;
img_thumb_width = 120;

</script>


<script type='text/javascript'>
//<![CDATA[
/******************************************
Auto-readmore link script, version 2.0 (for blogspot)

(C)2008 by Anhvo

visit http://en.vietwebguide.com to get more cool hacks
********************************************/
function removeHtmlTag(strx,chop){
if(strx.indexOf("<")!=-1)
{
var s = strx.split("<");
for(var i=0;i<s.length;i++){
if(s[i].indexOf(">")!=-1){
s[i] = s[i].substring(s[i].indexOf(">")+1,s[i].length);
}
}
strx = s.join("");
}
chop = (chop < strx.length-1) ? chop : strx.length-2;
while(strx.charAt(chop-1)!=' ' && strx.indexOf(' ',chop)!=-1) chop++;
strx = strx.substring(0,chop-1);
return strx+'...';
}

function createSummaryAndThumb(pID){
var div = document.getElementById(pID);
var imgtag = "";
var img = div.getElementsByTagName("img");
var summ = summary_noimg;
if(img.length>=1) {
imgtag = '<span style="float:left; padding:0px 10px 5px 0px;"><img src="'+img[0].src+'" width="'+img_thumb_width+'px" height="'+img_thumb_height+'px"/></span>';
summ = summary_img;
}

var summary = imgtag + '<div>' + removeHtmlTag(div.innerHTML,summ) + '</div>';
div.innerHTML = summary;
}
//]]>
</script>

Langkah Kelima
Cari kode <data:post.body/> dengan menggunakan langkah yang sama seperti cara ketiga.

Langkah Keenam
Ganti code <data:post.body/> dengan code yang di bawah ini :

<b:if cond='data:blog.pageType != "item"'>
<div expr:id='"summary" + data:post.id'><data:post.body/></div>
<script type='text/javascript'>createSummaryAndThumb("summary<data:post.id/>");</script>
<span class='rmlink' style='float:left'><a expr:href='data:post.url'>Read More- <data:post.title/></a></span>
</b:if>
<b:if cond='data:blog.pageType == &quot;item&quot;'><data:post.body/></b:if>

Keterangan 
var thumbnail_mode = "float" ; adalah letak gambar. Float menunjukkan gambar akan berada di sebelah kiri, jika anda tidak mau diganti disebelah kanan silahkan ganti dengan float:right.
summary_noimg = 250; adalah banyaknya karakter yang akan muncul pada home tanpa disertai gambar. summary_img = 250; adalah banyaknnya karakter yang akan muncul pada home disertai dengan gambar.
img_thumb_height = 120; Tinggi gambar yang akan muncul pada halaman home.
img_thumb_width = 120; Panjang gambar yang akan muncul pada halaman home.

Pada tulisan yang saya beri warna ungu adalah letak tulisan readmore tersebut berada. Float:left menunjukkan tulisan readmore akan berada di sebelah kiri, jika ingin mengganti ke sebelah kanan silahkan ganti float:left, dengan float:right.
Posted on 11.32 / 0 comments / Read More

Cara Setting GPRS di Handphone Untuk Semua Operator

Cara Setting GPRS di Handphone Untuk Semua Operator
Sekarang ini teknologi semakin banyak dan melesat. Apalagi dengan yang namanya internet, Dengan teknologi kita bisa mengakses dan bisa mengetahui perkembangan zaman sekarang ini. Mengakses internet bisa kita lakukan dengan dengan menggunakan modem atau disebut speedy. sekarang ini kita bisa mengakses internet dengan Handphone yang ada internetnya dengan Setting GPRS.

Untuk bisa mengakses internet lewat Handphone kita harus Setting GPRS terlebih dahulu, Nah disini saya akan memberikan Panduan Mudah Cara Setting GPRS.

Cara setting GPRS di Handphone Untuk Semua Operator sangat mudah, tinggal mengikuti panduan di bawah ini:

Cara Setting GPRS Telkomsel
APN : telkomsel
Username :WAP
Password : WAP123
Telkomsel WAP Setting
Home page : http://wap.telkomsel.com
Data Account: telkomsel
Connection type : HTTP
Proxy address: 010.001.089.130
Proxy port : 8000
Password : WAP123
Telkomsel MMS Setting
APN : mms
Username : wap
Password: wap123
WAP gateway IP address : 010.001.089.150
Port : 9210 (standard), 8000 (proxy)
Homepage : http://mms.telkomsel.com
 

ProXL GPRS Setting
APN : www.xlgprs.net
Username :XLgprs
Password: ProxlProXL WAP Setting
Homepage : http://wap.lifeinhand.com
Data Account : proxl
Connection type :HTTP
Proxy address : 202.152.240.050
Proxy port : 8080
Username : xlgprs
Password: proxl
Xl MMS Setting
APN : www.xlmms.net
Proxy address : 202.152.240.050
Homepage : http://mmc.xl.net.id/servlets/mms
Username : xlgprs
Password : proxl

Satelindo GPRS Setting
APN : indosatgprs
Username : indosat
Password : indosat
Satelindo WAP Setting
Homepage : http://wap.indosat.com
Data Account : satgprs
Proxy address: 010.019.019.019
Proxy port : 8080Username : indosat
Password : indosat
Satelindo MMS Setting
APN: indosatmms
Username : indosat
Homepage http://mmsc.indosat.com
Proxy address : 010.019.019.019
Proxy port: 8080
M3 GPRS Setting
Pin : 1234/4799
APN : indosatgprs
Username : indosat
Password : indosat
M3 WAP Setting
Homepage : http://wap.indosat.com
Data Account: m3-gprs
Connection type : http
Proxy address: 010.019.019.019
Proxy port : 8080
Username: indosat
Password: indosatM3 MMS Setting
Pin : 1234/4063
APN: indosatmms
Username:indosat
Password : indosat
Homepage : http://mmsc.indosat.com
Connection name : indosat mms


3 Three GPRS Setting
APN :3gprs
Username : 3gprs
Password: 3gprs
3 WAP Setting
homepage http://wap.three.co.id
data Account:3
connection type : http
proxy address : 010.004.000.010
proxy port : 3128
username : 3gprs
Password : 3gprs
3 MMS Setting
APN : 3mms
Username :3mms
Homepage : http://10.4.8.14
Proxy address : 010.004.000.810Proxy port : 3128
Username :3mms
Password:3mms
 

AXIS
Data Account : AXIS
Nama:AXIS
APN:AXIS
User name :axis
Sandi : 123456
AXIS Wap Setting
Nama: axisgprs
Layanan utama :wap.axisworld.co.id
Pintu layanan : 010.008.003.008
Port : 8080


Mudah sekali kan untuk setting GPRS, selamat mencoba dan semoga bermanfaat..
Posted on 02.27 / 0 comments / Read More
 
Copyright © 2011. Delta Net KABUNAN